Blogs
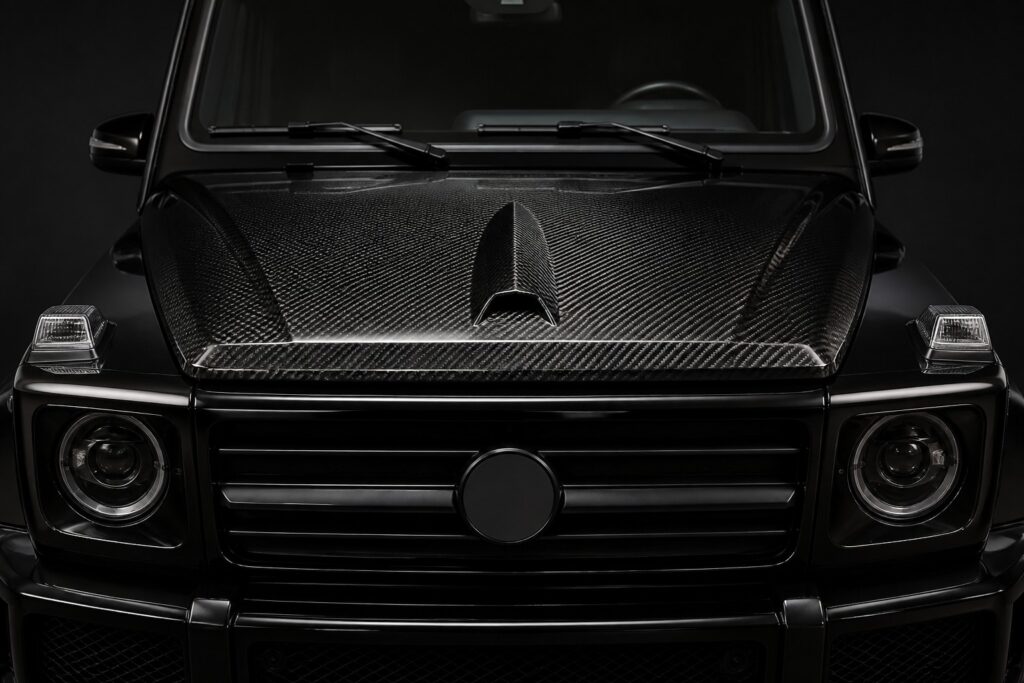
Carbon Fiber Hood with Shark Fin for Mercedes G-Class: Complete Guide 2026
Author: Jasper | RacingPartsWorld G-Class Parts Specialist | 10+ years experience in Mercedes G-Class aftermarket parts and performance upgrades Introduction The G-Class hood is a large, flat, vertical-faced panel — and that is exactly why it responds so well to a vented carbon replacement. The carbon fiber hood with shark fin replaces the factory steel hood with a dry carbon panel carrying a shark fin vent: the raised fin detail that breaks the flat surface and gives the front end the aggressive vented profile of the wide body builds. Engineered for the W464 and W463 G500 and G63, it is the upgrade that changes the front end more than any trim piece can. What the Upgrade Is The carbon fiber hood with shark fin is a major front-end body panel upgrade: Genuine dry carbon hood: the panel replaces the factory hood with dry carbon construction carrying the deep-gloss twill signature Shark fin vent: the raised fin detail adds a vented profile to the hood surface — the design element that distinguishes this hood from a flat carbon replacement Weight reduction: the dry carbon panel is substantially lighter than the factory steel hood Fitment: engineered for the W464 and W463 G500 and G63 Why the Hood Leads a Build The hood is the largest single body panel on the front of the vehicle: The biggest single visual change: a carbon hood alters the front end more than any set of trims — our best carbon fiber hoods for G-Wagon guide covers how the hood option compares within the category A vented profile: the shark fin adds a functional-looking design line to a surface that is otherwise plain steel — the front end gains depth from the moment the panel is fitted Material at scale: on a hood-sized panel, the carbon weave is visible in a way that no small trim can match — the material story reads at a distance Partner to the body kit: hood, front splitter, and wide body arches together form the front-end package — see our dry carbon fiber body kit guide Fitment, Fitment Discipline, and Installation Model Hood Fitment W464 G500 / G63 Yes W463 G500 / G63 Yes Installation is a body-panel project — this is not a trim swap: Remove the factory hood and transfer the hinges, latch hardware, and any hood-mounted components Test-fit the carbon hood with shims before final alignment — panel gap consistency is the whole job Align the panel to the fender and grille gaps on both sides Transfer the hood struts and confirm the hood opens, holds, and latches correctly Finish and seal — clear coat care and edge sealing protect the panel long-term Professional body-shop installation is recommended. Budget 3-5 hours with finishing. A hood that does not align perfectly is more visible than any other imperfect panel on the vehicle. The Vented Carbon Front The hood leads the front-end program: Complete the front end: pair the hood with the front splitter, headlight-level carbon, and bumper pieces for a full carbon front — see our carbon fiber exterior accents guide Add the light layer: carbon hood and lighting upgrades work together as the two front-end signatures — see our dry carbon LED DRL headlight frames guide Engine bay context: a carbon hood sits above the engine bay, where an engine cover completes the presentation — see our G63 carbon fiber engine cover upgrade guide Care from day one: a hood takes stone chips, UV, and heat — the cleaning and protection discipline in our wide body maintenance guide applies with extra attention at the leading edge Frequently Asked Questions Does the hood fit my W464 or W463 G500 or G63? Yes — the carbon fiber hood with shark fin is engineered for the W464 and W463 G500 and G63. Is it a direct bolt-on replacement? The hood replaces the factory panel and reuses the hinges, latch, and struts — professional alignment is recommended for correct panel gaps. Does the hood reduce weight? Yes — dry carbon construction is substantially lighter than the factory steel hood. Is the vent functional? The shark fin is a design element that also provides venting at the hood surface — airflow benefits depend on your installation and engine bay setup. Will the hood need painting? No — the panel is finished in dry carbon and clear coat; no paint is required. Shop This Upgrade Browse our carbon fiber hood with shark fin for W464 and W463 G500 and G63 — dry carbon vented hood panel, shipped worldwide. Sources RacingPartsWorld Body Panel Records (2022-2026, n=40+), Fitment Validation Data, Customer Build Documentation Last updated: September 2026
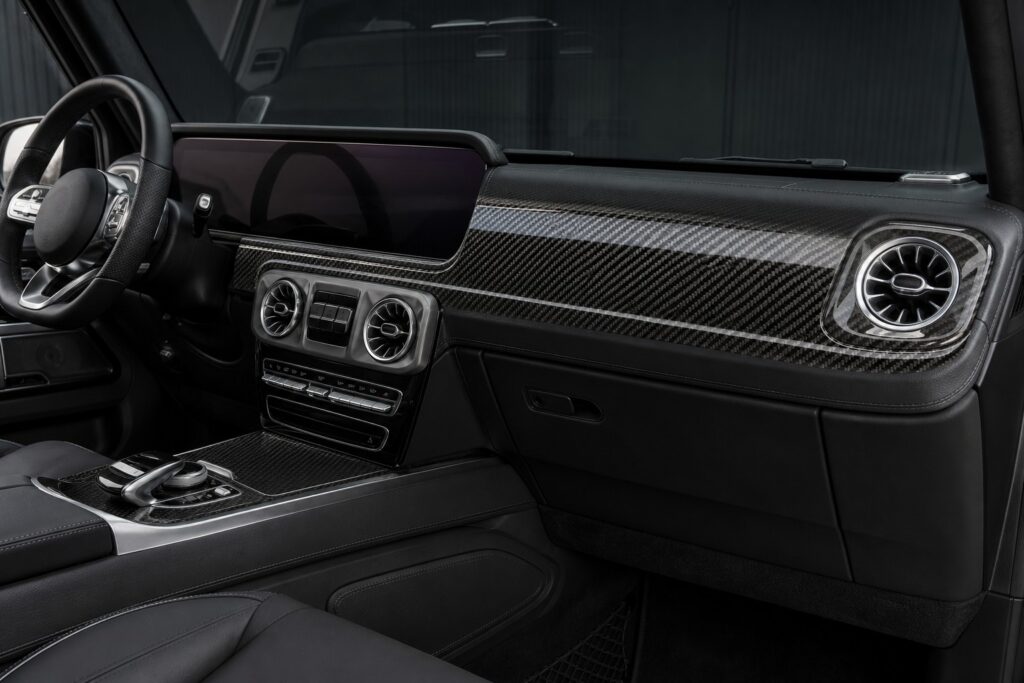
Carbon Fiber Front Dashboard Panel for Mercedes G-Class: Complete Guide 2026
Author: Jasper | RacingPartsWorld G-Class Parts Specialist | 10+ years experience in Mercedes G-Class aftermarket parts and performance upgrades Introduction The dashboard is the single largest interior surface in the G-Class cabin — and on the W464 and W463A it is finished in factory materials that no passenger ever remarks on. The carbon fiber front dashboard panel changes that. The panel replaces the dashboard trim surface with genuine dry carbon, turning the widest surface in the cabin into the strongest statement in it. Built for the W464 and W463A G63, G550, and G500 (2019-2025), it is the interior upgrade that the front-seat view never recovers from. What the Upgrade Is The carbon fiber front dashboard panel is a primary interior surface upgrade: Genuine dry carbon: the panel is finished in dry carbon with the deep-gloss twill signature, laid out across a large surface where the weave is fully visible The widest interior upgrade: the dashboard spans the full cabin width — no other carbon piece covers as much visible area W464 and W463A fitment: engineered for the W464 and W463A G63, G550, and G500 (2019-2025) The anchor of the cabin: the panel becomes the reference point the rest of the interior carbon is read against Why the Dashboard Is the Priority Piece If a cabin build starts anywhere, it starts here: Maximum visibility per piece: a passenger sees the dashboard from every seat, every journey — no other interior carbon piece gets this exposure The weave shows properly: on a large flat panel the twill pattern reads clearly, which is what makes quality carbon visible — see our guide on detecting quality dry carbon fiber parts for what a good weave looks like across a big surface It sets the cabin's material language: once the dashboard is carbon, the door panels, console, and seat pieces follow logically — this is the layering principle in our G63 interior carbon fiber upgrades guide Factory-clean alternative: unlike a wrapped finish, a genuine dry carbon panel delivers the reflection and depth that identifies real carbon at a glance Fitment and Installation Model Dashboard Panel Fitment W464 G63 / G550 / G500 Yes (2019-2025) W463A Yes Installation is an interior trim project: Disconnect the battery before working around dashboard trim and connectors — the discipline covered in our W465 interior trim kit direction Remove the factory dashboard trim at the clip and fastener points, using proper trim tools Test-fit the carbon panel and confirm alignment with vents, screens, and grab handle openings Mount the panel and secure it at all points Refit the trim and verify every opening lines up and no rattle exists Budget 2-3 hours at a professional, longer for a first-time DIY install. The dashboard surrounds screens, vents, and switches — rushed work here risks both the panel and the factory trim underneath. Building the Interior Around It The dashboard panel is the foundation of the cabin program: Continue across the cabin: door panels, door sill guards, and console pieces extend the material — see our carbon fiber door panel guide and LED door sill guards guide Add the seats: seat backrests and seat side covers bring the carbon to the seat line — see our carbon fiber seat backrest upgrade guide Coordinate the light: ambient elements sit beside carbon naturally — see our 64-color ambient light turbo vents guide See the full menu: for how the dashboard fits into the complete interior build order, see our top interior upgrades guide Frequently Asked Questions Does the panel fit my W464 or W463A? Yes — the carbon fiber front dashboard panel is engineered for the W464 and W463A G63, G550, and G500 (2019-2025). Does it interfere with the vents, screens, or grab handle? No — the panel is shaped around the factory dashboard openings and features. Is it a replacement or an overlay? The panel upgrades the dashboard trim surface — confirm the exact installation method on the product page for your model year. Will the weave match my existing carbon interior pieces? Yes, when the weave matches your existing pieces — see the consistency guidance in our guide on detecting quality dry carbon fiber parts. Can I install it myself? It is a two-to-three hour trim project that surrounds screens and switches — possible DIY work, but a professional guarantees the cleanest result. Shop This Upgrade Browse our carbon fiber front dashboard panel for W464 and W463A G63, G550, and G500 (2019-2025) — the anchor piece of a full carbon cabin, shipped worldwide. Sources RacingPartsWorld Interior Records (2023-2026, n=50+), Fitment Validation Data, Customer Build Documentation Last updated: September 2026
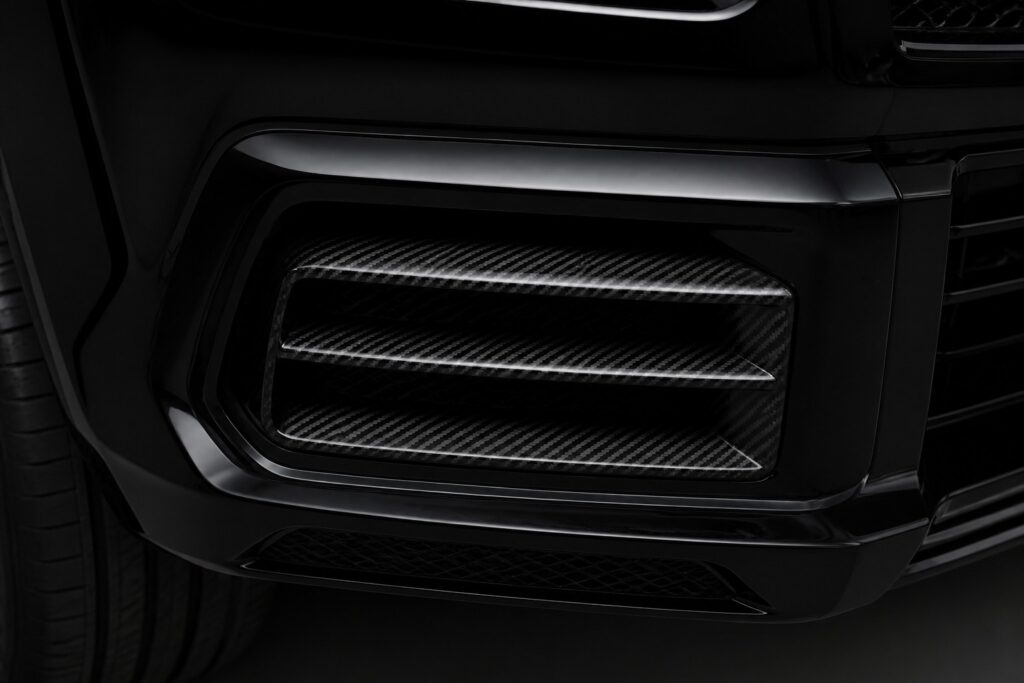
Dry Carbon Front Bumper Vent Covers for Mercedes G-Class W465: Complete Guide 2026
Author: Jasper | RacingPartsWorld G-Class Parts Specialist | 10+ years experience in Mercedes G-Class aftermarket parts and performance upgrades Introduction The W465 front bumper carries a set of vent inserts at the lower corners — functional openings finished in factory plastic. On an otherwise built front end, those plastic vents are the detail that gives the build away. The dry carbon front bumper vent covers for the W465 replace them with genuine dry carbon inserts, bringing the material signature to the bumper's own ventilation features. Built for the 2025 W465 G500 and G63, it is the small front-end upgrade with an outsized effect. What the Upgrade Is Dry carbon front bumper vent covers for the W465 are a front-end detail upgrade: Genuine dry carbon inserts: the covers replace the factory bumper vent trim with dry carbon pieces carrying the deep-gloss twill signature Vent function preserved: the covers are shaped to the vent openings, keeping the ventilation path intact W465-specific fitment: engineered for the W465 G500 and G63 (2025) bumper architecture — the newest G-Class generation Front-end completion: the covers finish the last plastic surface on a carbon-built front end Why the W465 Front Needs These The W465 is the newest G-Class and the one with the most plastic front detailing: The newest generation gets the least aftermarket support: most parts are still made for the W464 — W465 owners have a narrow catalog, and this is the reason our W465 dry carbon LED DRL headlight frames guide and W465 carbon fiber interior trim kit guide matter The visibility position: the bumper vents sit directly below the headlights, in the eye line of anyone looking at the front of the vehicle Consistency reads as quality: a build with carbon headlight frames, carbon grille details, and plastic bumper vents has an obvious gap — the vent covers close it (see our complete dry carbon conversion guide for the full-package standard) No mechanical compromise: the covers fit the vent openings rather than blocking them, so the bumper's original function is untouched Fitment and Installation Model Bumper Vent Cover Fitment W465 G500 Yes (2025) W465 G63 Yes (2025) Installation is a bumper-trim job: Clean and prepare the vent surround at the bumper opening Test-fit the carbon cover against the vent shape Mount the cover using the recommended method for the trim position Verify the vent opening remains clear and the cover sits flush on all edges Budget 30-60 minutes. Confirm the model year when ordering — W465 bumper detailing can differ across trims. The W465 Carbon Front The vent covers work as part of the W465 front program: Layer the front: pair with the dry carbon LED DRL headlight frames for the headlight-level piece — see our dry carbon LED DRL headlight frames guide Add the light detail: carbon fog light frames with LED complete the lower front — see our dry carbon fog light frames guide Continue the material: carbon exterior accents across the body connect the front to the rest — see our carbon fiber exterior accents guide Protection reality: bumper-level carbon sits in the stone-chip zone — the care routine in our wide body maintenance guide applies from day one Frequently Asked Questions Do the covers fit my W465? Yes — the dry carbon front bumper vent covers are engineered for the W465 G500 and G63 (2025). Do they block the bumper vents? No — the covers are shaped to the vent openings and preserve the ventilation path. Will they fit a W464 bumper? No — the covers are shaped for the W465 bumper architecture. W464 owners should use W464-specific front pieces. How are they mounted? The mounting method is detailed on the product page — the position is a trim-level fit at the bumper opening. Can I install them myself? Yes — 30-60 minutes with basic trim tools. Shop This Upgrade Browse our dry carbon front bumper vent covers for the W465 G500 and G63 (2025) — genuine dry carbon vent trim for the newest G-Class front end, shipped worldwide. Sources RacingPartsWorld W465 Front Records (2025-2026), Fitment Validation Data, Customer Build Documentation Last updated: September 2026
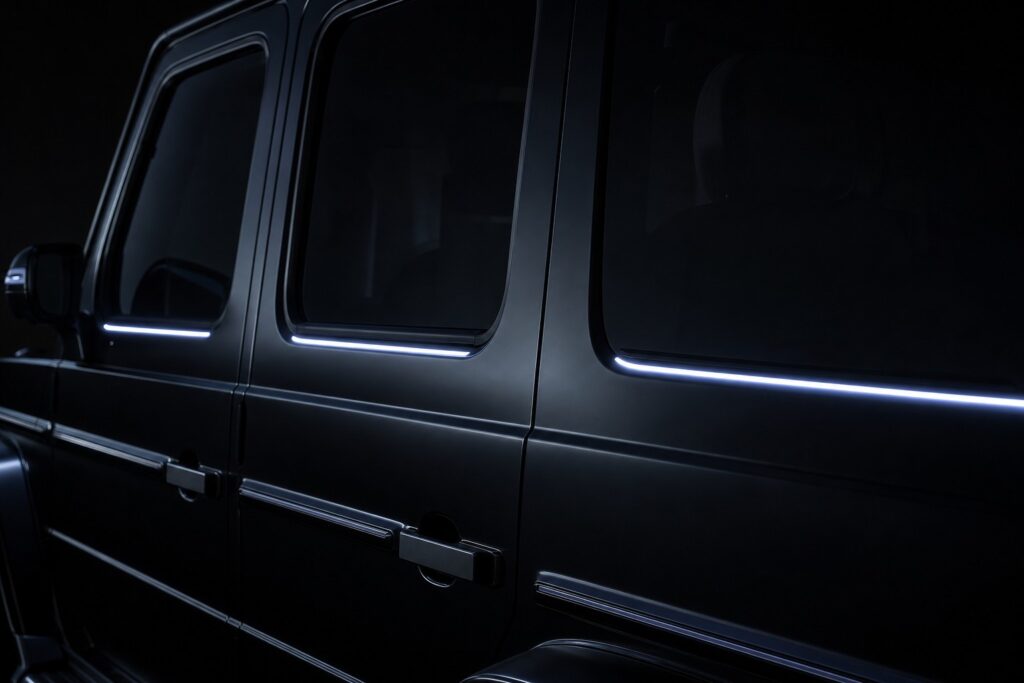
Glowing Belt Line Light Trim for Mercedes G-Class: Complete Guide 2026
Author: Jasper | RacingPartsWorld G-Class Parts Specialist | 10+ years experience in Mercedes G-Class aftermarket parts and performance upgrades Introduction The belt line — the horizontal strip where the glass meets the body along the doors — is the longest uninterrupted line on the G-Class. It runs from the front fender to the rear quarter and it is the line the eye follows when a G-Class drives past. The glowing belt line light trim turns that line into a lit element: an illuminated trim strip that traces the belt line in the cabin's ambient color program. Available for the W464 G350, G400, G500, G550, and G63 (2019+), it is the exterior lighting upgrade nobody expects. What the Upgrade Is The glowing belt line light trim is an exterior ambient lighting upgrade: Belt line trim replacement: the trim replaces the factory belt line strip with an illuminated version Ambient color program: the glow runs in the vehicle's ambient color range, coordinated with the cabin lighting Full-length line: the trim traces the belt line along the doors — a continuous lit line rather than a point light Fitment: engineered for the W464 G350, G400, G500, G550, and G63 (2019+) Why the Belt Line Is the Right Place for Light Exterior lighting upgrades usually stop at the headlights and grille. The belt line changes the rules: The longest sightline: no other element on the G-Class offers a continuous horizontal line from front to rear — a lit belt line reads instantly at night and in a crowd Exterior meets interior: the belt line glow extends the ambient lighting program, which until now has lived inside the cabin — see our 64-color ambient light turbo vents guide and LED ambient speaker covers direction for the interior counterpart The modern signature: illuminated belt line trim is the language of recent flagship design — the upgrade brings that signature to the W464 Subtle in daylight, dramatic at night: the trim reads as a clean factory-style strip by day and a defined light line after dark Fitment and Installation Model Belt Line Light Trim Fitment W464 G350 / G400 Yes W464 G500 / G550 Yes W464 G63 Yes Installation is a trim and wiring job: Remove the factory belt line trim carefully along the door and quarter sections Fit the illuminated trim into the same channel, confirming the alignment at each door junction Route and connect the lighting circuit to the ambient power source Test the illumination along the full length before final assembly Verify sealing at the glass-to-body line — the belt line sits in a water path Budget 2-3 hours at a professional. The trim runs across door junctions, so alignment and sealing discipline determine whether the result looks factory. See the door trim handling guidance in our carbon fiber door panel guide. The Exterior Lighting Program The belt line completes the exterior light story: Layer the light: pair with headlight-level upgrades and grille elements for a full front-to-rear lighting program — see our smoked black LED headlights guide, LED grille emblem upgrade, and G63 smoked lighting package guide Coordinate the theme: on a dark or smoked build the belt line glow is the strongest single visual signature — the same reasoning behind our smoked lighting package guide Pair with carbon: illuminated trim sits naturally beside carbon exterior detailing — see our carbon fiber exterior accents guide Care: exterior illuminated trim needs clean glass and trim channels — the cleaning discipline in our wide body maintenance guide covers the routine Frequently Asked Questions Does the trim fit my W464? Yes — the glowing belt line light trim is engineered for the W464 G350, G400, G500, G550, and G63 (2019+). Does the glow color match my ambient lighting? The trim runs in the ambient color program — confirm the color options in the product listing for your model year. Is installation reversible? The trim replaces the factory belt line strip in the same channel — a reversible trim-level install without body modification. Will it leak water into the cabin? Properly installed, the trim seals at the same points as the factory strip — the sealing step is why professional installation is recommended. Can I run it in daylight only or always on? The lighting function is wired to your chosen circuit — many owners run it linked to the ambient or parking light circuit. Shop This Upgrade Browse our glowing belt line light trim for W464 G350, G400, G500, G550, and G63 (2019+) — illuminated exterior belt line in the ambient color program, shipped worldwide. Sources RacingPartsWorld Exterior Lighting Records (2024-2026, n=35+), Fitment Validation Data, Customer Build Documentation Last updated: September 2026
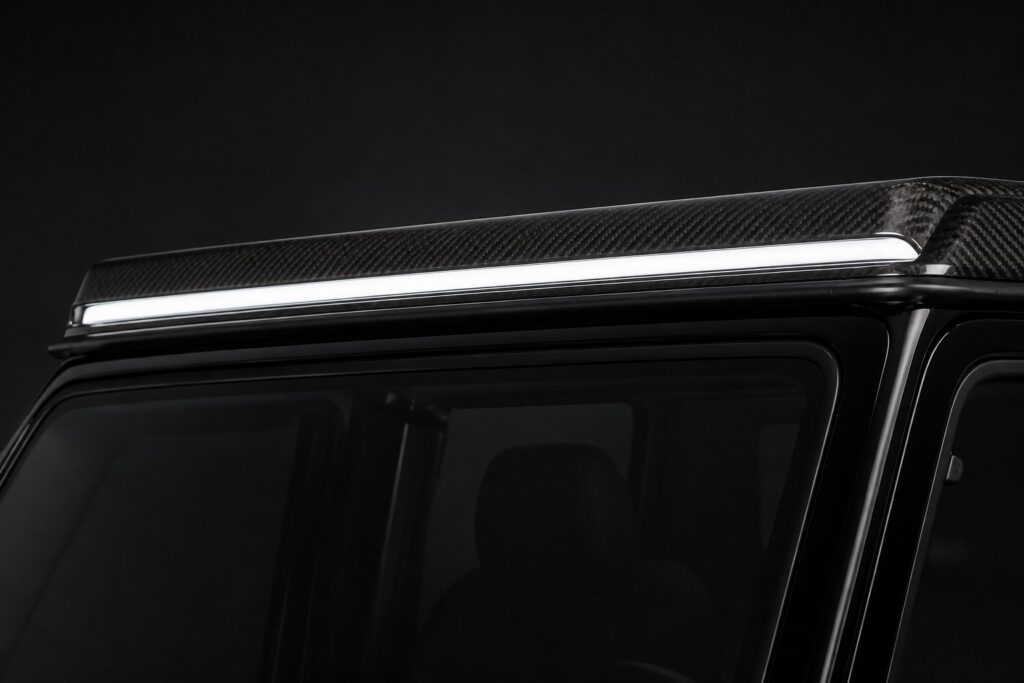
Carbon Fiber Roof Light Bar for Mercedes G-Class: Complete Guide 2026
Author: Jasper | RacingPartsWorld G-Class Parts Specialist | 10+ years experience in Mercedes G-Class aftermarket parts and performance upgrades Introduction The roof line is the one surface of a G-Class that stays invisible in every build photo taken from the front — and the one surface everyone sees when the vehicle is parked among other SUVs. The carbon fiber roof light bar converts that plain roof edge into an integrated lighting and aero element: a genuine dry carbon housing with integrated LED lighting that runs across the roofline, giving the W464 and W465 the B-style roof signature that modern flagship builds carry. What the Upgrade Is The carbon fiber roof light bar is a roof-level appearance and lighting upgrade: Genuine dry carbon housing: the bar is finished in dry carbon with the deep-gloss twill signature, matched to the rest of a carbon build Integrated LED lighting: the bar carries a lighting element that adds a light signature at the roofline — visible from the front and the side B-style roof treatment: the roof bar design associated with the modern wide body builds, completing the upper silhouette Fitment: engineered for the W464 and W465 G63 and G550 (2019-2025) Why the Roof Line Completes the Build Owners complete the front, the sides, the rear — and stop at the roof: The missing top layer: a W464 with a carbon body kit, carbon exterior accents, and factory roof trim is a build with one untreated level — the roof bar closes it (see our complete dry carbon conversion guide for the full-package logic) Silhouette reading: the G-Class silhouette is defined by flat surfaces and hard edges; a carbon roof element adds a horizontal design line exactly where the eye tracks the roofline Light and material together: the bar combines the two signature languages of a modern build — carbon material and LED light — in a single piece, the same combination behind our dry carbon LED DRL headlight frames guide Photo and presence value: the roof line is what identifies the vehicle in traffic and in every front-facing photograph Fitment and Installation Model Roof Light Bar Fitment W464 G63 / G550 Yes (2019-2025) W465 Yes Installation is a roof-level project: Prepare the roof surface and confirm the mounting position and any factory roof rail or trim conflicts Test-fit the carbon bar before any drilling or adhesive work Mount and seal the bar — water sealing at the roof line is the critical step Route the LED wiring through the existing roof or A-pillar channels with proper grommets Seal and verify — a leak test at the mounting points before regular use Budget 2-4 hours at a professional. Roof-level electrical work and sealing should be treated as a professional install for most owners — a poor seal at the roof line leads to water ingress that costs far more than the install. Building the Carbon Roof Program The roof bar works with the wider exterior direction: Roof and cargo: if you run a roof rack platform, confirm clearance and adjust the layout so the light bar and rack coexist — see our roof rack and cargo guide Aero and stance: the roof level completes the aero reading set by the front splitter and rear treatments — see our carbon fiber exterior accents guide Wide body harmony: on a G800 or G900 style build the roof signature is part of the package — see our G900 Rocket body kit guide and G800 vs G900 wide body comparison Care: roof-level carbon faces UV and weather directly — the cleaning and protection discipline in our wide body maintenance guide applies with extra attention Frequently Asked Questions Does the roof light bar fit my W464 or W465? Yes — the bar is engineered for the W464 and W465 G63 and G550 (2019-2025). Does the installed bar leak? Properly installed and sealed, the bar does not leak — the sealing step is why professional installation is recommended. Can I install it with a roof rack? Often yes, but clearance and mounting positions must be confirmed. Check our roof rack and cargo guide for the layout considerations. Is the LED lighting always on? The lighting function is wired to your chosen circuit — many owners run it as a switchable or DRL-linked element. Will it match my existing carbon pieces? Yes, when the weave matches — see the consistency guidance in our guide on detecting quality dry carbon fiber parts. Shop This Upgrade Browse our carbon fiber roof light bar for W464 and W465 G63 and G550 (2019-2025) — B-style dry carbon roof housing with integrated lighting, shipped worldwide. Sources RacingPartsWorld Roof Systems Records (2024-2026, n=30+), Fitment Validation Data, Customer Build Documentation Last updated: September 2026
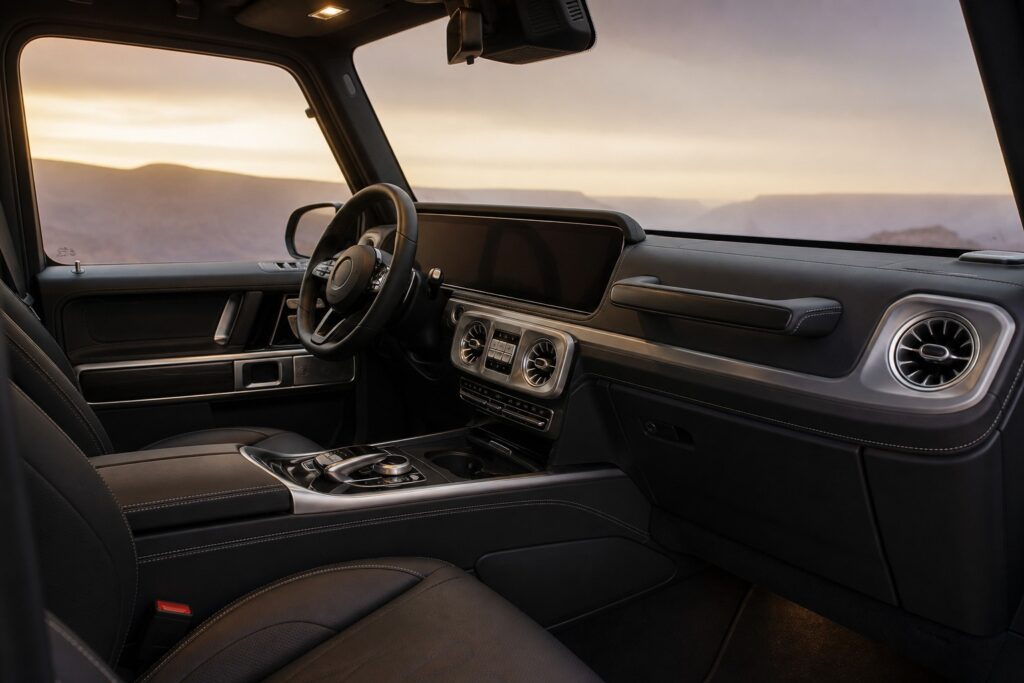
Mercedes G-Class Comfort & Convenience Upgrade Guide 2026
Author: Jasper | RacingPartsWorld G-Class Parts Specialist | 10+ years experience in Mercedes G-Class aftermarket parts and performance upgrades Introduction The G-Class is an icon — but icons are not always convenient. Between the heavy doors, the tall step-in height, the limited cabin storage, and the plain factory pedals, daily life in a G-Class involves small frictions that owners simply accept. The comfort and convenience upgrade program removes those frictions one by one: the upgrades that are used on every single drive, every single day. The Comfort Upgrade Stack 1. Auto Soft Close Doors The heavy G-Class doors are the first daily friction — half-closed doors, the chime, the reach-over push. The auto soft close door kit engages a power suction mechanism that closes the doors fully with a soft, controlled thunk. See our auto soft close door kit guide for the full breakdown. 2. Side Steps for Easy Entry The G-Class step-in height makes entry a climb for passengers. Side steps and running boards create a stable step surface, protecting the seat bolsters from slide-in wear at the same time. See our side steps and running boards guide for the fitment details. 3. Cabin Storage Solutions The G-Class cabin is short on clever storage. The passenger grab handle storage box converts the A-pillar handle into usable space, and console storage upgrades put the daily items in reach. See our center console cup holder and grab handle storage box guides for the storage program. 4. Anti-Slip Pedal Covers Wet shoes and smooth soles make factory pedals less certain than they should be. Anti-slip pedal covers add a positive grip surface to the pedals without drilling — installed in minutes. See our anti-slip pedal covers guide for the no-drill detail. Why Comfort Upgrades Matter The comfort program delivers where cosmetic builds cannot: Every-drive value: a cup holder, a stable step, a door that closes properly — these are felt on every single journey, unlike a visual upgrade seen only when parked Protection built in: side steps save the seat bolsters, pedal covers save the factory pedals, storage keeps the cabin tidy — the program protects while it improves The daily-driver G-Class: for owners who actually drive their G-Class daily, comfort upgrades are the highest-value spend in the catalog Resale discipline: convenience upgrades are reversible and desirable — the right comfort program supports the resale story in our resale value guide Building Your Comfort Program The comfort stack builds in layers: Start with daily friction: soft close doors and side steps address the two most frequent daily annoyances — the biggest comfort win per dollar Add the cabin layer: cup holders, storage, and pedal covers round out the interior experience Coordinate with the wider build: the comfort program sits alongside the interior styling direction — see our top interior upgrades guide for the full interior menu Seasonal synergy: the comfort stack is especially valuable in winter — see our G-Class winter preparation guide for the seasonal program Frequently Asked Questions Which comfort upgrade delivers the most value? Auto soft close doors and side steps address the most frequent daily frictions — they are the recommended starting point for most owners. Are comfort upgrades reversible? Yes — the no-drill and bolt-on designs install without permanent modification, preserving the resale story. Do comfort upgrades affect the warranty? The reversible, no-drill designs typically do not affect vehicle warranties — the same discipline as our other bolt-on programs. Can I install them myself? Most comfort upgrades are DIY-friendly — side steps, pedal covers, and storage install in under an hour; soft close doors benefit from professional installation. Do they work together as a program? Yes — the upgrades are designed as a coordinated stack that removes daily friction across entry, doors, cabin storage, and pedal control. Shop This Program Browse the comfort and convenience program: auto soft close door kit, side steps and running boards, center console cup holder, anti-slip pedal covers, and passenger grab handle storage box — each shipped worldwide. Sources RacingPartsWorld Owner Comfort Survey (2024-2026, n=90), Daily Usage Documentation, Customer Feedback Records Last updated: September 2026
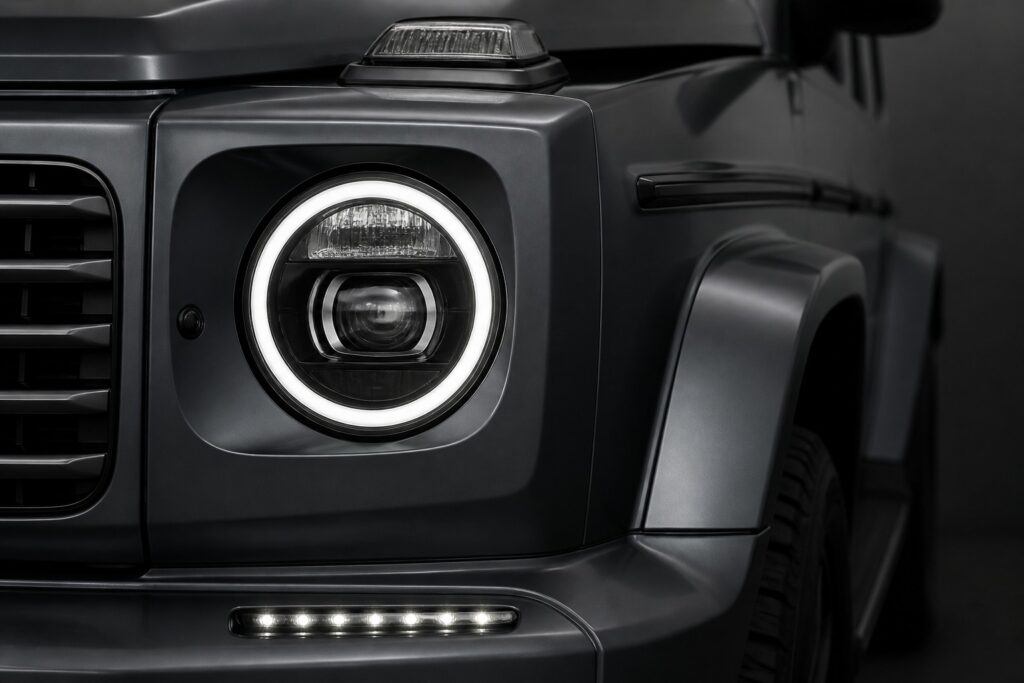
LED DRL Turn Signal Lights for Mercedes G-Class W463: Complete Guide 2026
Author: Jasper | RacingPartsWorld G-Class Parts Specialist | 10+ years experience in Mercedes G-Class aftermarket parts and performance upgrades Introduction The W463 G-Class front lighting is iconic — round headlights and a character that has not changed in decades. The LED DRL turn signal lights bring the W463 front into the modern light era without changing its identity: daytime running light function and an upgraded turn signal integrated into the front positions, engineered for the W463 G63, G65, G55, and G500. The classic face, modern lighting. What the Upgrade Is The LED DRL turn signal lights are a W463 front lighting upgrade: Daytime running light function: LED DRL elements give the W463 the modern always-on light signature that improves daytime visibility Upgraded turn signal: the turn signal function moves to bright LED output — faster and more visible than the factory incandescent Front-end modernization: the lights update the classic W463 front without altering its design character Fitment: engineered for the W463 G63, G65, G55, and G500 Why the W463 Front Benefits The W463's timeless face deserves modern lighting technology: Daytime visibility: DRL is a proven safety feature — the W463's era predates the standard, and the upgrade brings the benefit to the classic front The modern signature: the LED light language of newer G-Class generations reads instantly — the DRL upgrade brings that language to the W463 (see our LED grille emblem upgrade guide for the front light program) Classic character preserved: the upgrade works with the W463's round-light identity rather than replacing it — the modernization path for the enduring design Fitment and Installation Model DRL Turn Signal Fitment W463 G63 / G65 Yes W463 G55 / G500 Yes Installation is a front-position light swap: Access the front light position per the instructions Remove the factory unit and disconnect Install the LED DRL turn signal unit Connect the DRL and turn signal circuits correctly Test both functions before final assembly Budget 1-2 hours at home or less at a professional. Confirm the model-year and position match when ordering — W463 light positions vary across the range. The W463 Modernization Path The DRL lights are part of bringing the classic G-Class current: The modernized classic: combine with the smoked lighting theme and modern exterior details for the refreshed W463 look — see our smoked black LED headlights guide and G63 smoked lighting package guide The conversion direction: for owners taking the W463 further, the conversion program brings newer-generation styling — see our W463 to W464 conversion guide Lighting safety: any lighting upgrade must maintain or exceed factory function — LED DRL and turn signal output deliver on both roles Frequently Asked Questions Do the lights fit my W463? Yes — the LED DRL turn signal lights are engineered for the W463 G63, G65, G55, and G500. Confirm the light position and model year when ordering. Are the DRL and turn signal functions both included? Yes — the unit provides daytime running light function plus the upgraded LED turn signal. Are they street-legal? The unit is designed to maintain legal function — confirm local regulations on DRL color and turn signal visibility before installation. Will they change the classic W463 look? The upgrade modernizes the lighting while preserving the W463's round-headlight character — a modernization rather than a redesign. How long does installation take? 1-2 hours at home — a front-position swap with two circuit connections. Shop This Upgrade Browse our LED DRL turn signal lights for the W463 G63, G65, G55, and G500 — modern DRL and turn signal function for the classic front, shipped worldwide. Sources RacingPartsWorld W463 Lighting Records (2023-2026, n=55+), Fitment Validation Data, Customer Build Documentation Last updated: September 2026
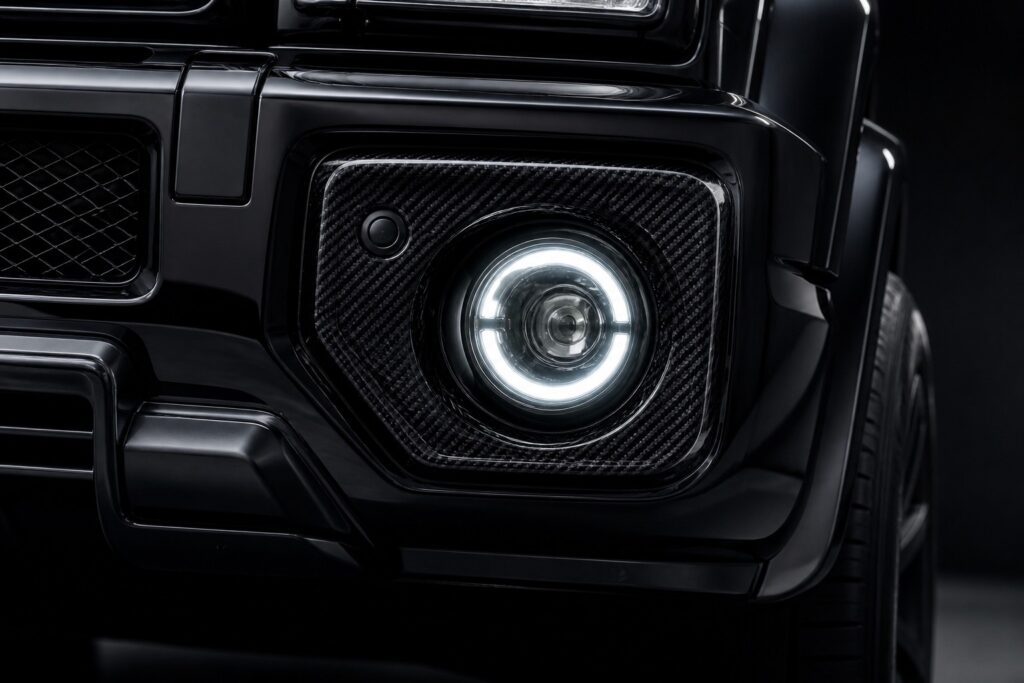
Dry Carbon Fog Light Frames with LED for Mercedes G-Class: Complete Guide 2026
Author: Jasper | RacingPartsWorld G-Class Parts Specialist | 10+ years experience in Mercedes G-Class aftermarket parts and performance upgrades Introduction The fog light housings frame the lower front corners of the G-Class — and on the W464 and W463A they are one of the few remaining plastic details on an otherwise built front end. Dry carbon fog light frames with integrated LED elements replace the factory fog surrounds with genuine dry carbon rings, adding both the material signature and a lighting element at the bumper level. The detail upgrade that finishes the lower front treatment. What the Upgrade Is Dry carbon fog light frames with LED are a front-end detail upgrade: Genuine dry carbon frames: the fog light surrounds are finished in dry carbon with the twill signature Integrated LED element: the frames carry an LED lighting element, adding a light signature at the fog light position Lower front completion: the frames tie the bumper level into the carbon and lighting program of the build Fitment: engineered for the W464 and W463A G63 Why the Fog Light Position Completes the Front The fog housings are the last untreated surface on a built front end: The finishing position: after the headlight frames, grille, and lower lip treatments, the fog surrounds are the remaining plastic detail — carbon frames close that gap (see our dry carbon LED DRL headlight frames guide for the headlight-level program) The light layering: an LED element at the fog position joins the headlight, DRL, and grille lighting into a layered front light story — see our smoked black LED headlights guide The functional position: the fog position upgrade keeps the fog function while elevating the surround — form and function in one step Fitment and Installation Model Fog Frame Fitment W463A G63 Yes W464 G63 Yes Installation is a bumper-position job: Access the fog light housing from behind the bumper Remove the factory surround carefully Fit the dry carbon frame with the LED element Connect the LED circuit per the instructions Verify the fog function and LED before refitting Budget 45-90 minutes at home or less at a professional. Confirm the bumper architecture matches your model year when ordering. Building the Carbon Front The fog frames work with the full front program: Pair with carbon details: exterior carbon accents across the front create the material theme — see our carbon fiber exterior accents guide Pair with lighting: the LED elements coordinate with the front lighting direction from our LED grille emblem upgrade guide Protection reality: bumper-level carbon sits in the impact zone — the care program in our wide body maintenance guide applies to the front pieces Frequently Asked Questions Do the frames fit my W463A or W464 G63? Yes — the dry carbon fog light frames are engineered for the W463A and W464 G63 bumper fog positions. Do they replace the factory fog light function? No — the frames upgrade the surround while preserving the fog light function. Is the LED wiring complex? The LED element connects to the lighting circuit — straightforward for installers comfortable with lighting wiring. Do they match my other carbon exterior pieces? Yes, when the weave matches your existing front carbon — check the consistency guidance in our guide on detecting quality dry carbon fiber parts. How long does installation take? 45-90 minutes at home — a bumper-position swap with one light circuit connection. Shop This Upgrade Browse our dry carbon fog light frames with LED for W463A and W464 G63 — carbon surrounds with integrated light element, shipped worldwide. Sources RacingPartsWorld Front Detail Records (2024-2026, n=45+), Fitment Validation Data, Customer Build Documentation Last updated: September 2026
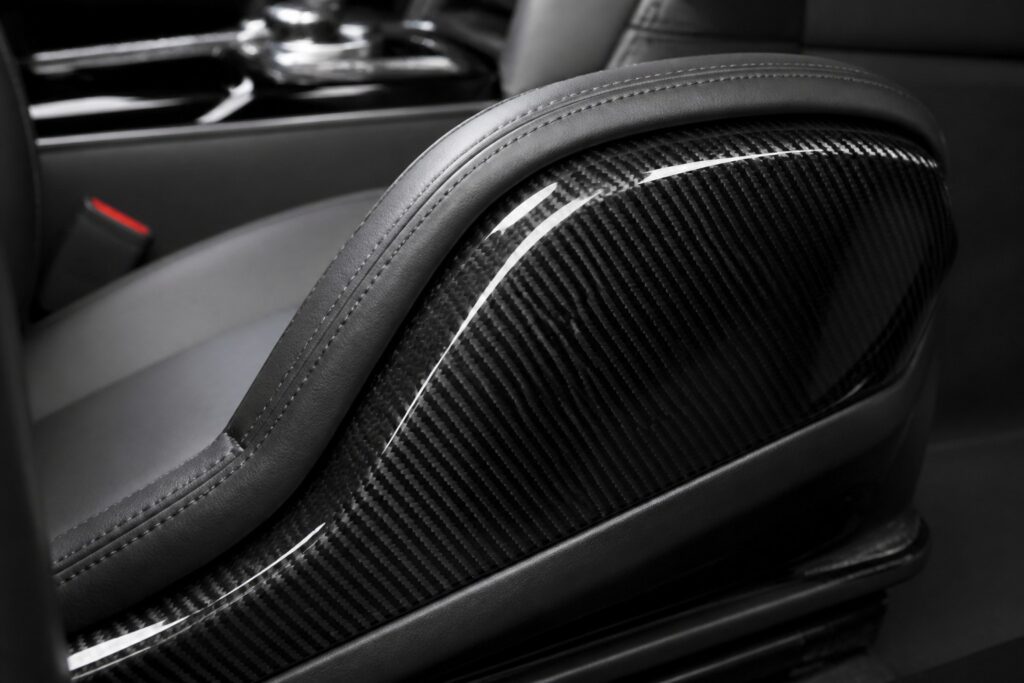
Dry Carbon Fiber Seat Side Covers for Mercedes G-Class: Complete Guide 2026
Author: Jasper | RacingPartsWorld G-Class Parts Specialist | 10+ years experience in Mercedes G-Class aftermarket parts and performance upgrades Introduction The seat side covers — the panels on the outer edges of the front seats — take a beating. Shoes brush them on every entry, seatbelt buckles scratch them, and on the W464 G63 they are plain factory plastic. The dry carbon fiber seat side covers (set) replace them with genuine dry carbon, protecting the vulnerable surface and adding the material signature to the seats themselves. Built for W463A and W464 models (2019-2024), it is the detail upgrade that protects while it transforms. What the Upgrade Is Dry carbon fiber seat side covers are a seat protection and styling upgrade: Genuine dry carbon: the side covers are finished in dry carbon with the deep-gloss twill signature Protection function: the carbon panels shield the seat side from the shoe scuffs and buckle scratches of daily entry — the most-abused surface on the seat Seat-level styling: the covers bring the carbon material language to the seats, matching the cabin program Fitment: engineered for W463A and W464 G63 and G500 seats (2019-2024) Why the Seat Sides Need the Upgrade The seat side covers are the most vulnerable interior surface: The daily abuse zone: entry scuffs, seatbelt buckle impact, and heel contact all land on the side cover — the plastic factory panel shows every mark within months Hard-to-clean surface: scuffed plastic is difficult to restore — carbon protects the position before the damage happens The visible position: the side cover is visible from every angle — through the open door, to rear passengers, and from outside the vehicle The seat program: side covers complete the seat direction alongside seat backrests — see our carbon fiber seat backrest upgrade guide for the full seat program Installation and Fitment Model Seat Side Cover Fitment W463A G63 / G500 Yes W464 G63 / G500 Yes (2019-2024) Installation is a seat-trim job: Access the seat side cover at the outer seat edge Release the factory cover at its mounting points Fit the dry carbon cover and secure it Verify the fit — seat movement and adjustment must be unaffected Budget 20-40 minutes per seat. Confirm the seat architecture matches when ordering — seat designs vary across the W463A/W464 range. Completing the Carbon Cabin The side covers continue the cabin material program: Protect and style together: this is the rare upgrade that both guards a surface and elevates it — the protective logic mirrors our wide body maintenance guide applied inside the cabin The full seat story: side covers, seat backrests, and interior trim pieces build the complete carbon seat and cabin program — see our carbon fiber interior trim kit direction and G63 interior carbon fiber upgrades guide Material consistency: match the weave to your existing carbon pieces per the guidance in our guide on detecting quality dry carbon fiber parts Frequently Asked Questions Do the covers fit my W463A or W464 seats? Yes — the set is engineered for W463A and W464 G63 and G500 seats (2019-2024). Confirm the seat style when ordering. Do they protect against scratches? Yes — the dry carbon covers shield the seat side from entry scuffs and buckle contact, protecting the vulnerable factory surface. Does installation affect seat adjustment? No — the covers mount at the side cover position without interfering with seat movement or adjustment. Will they match my seat backrest carbon? Yes, when the weave matches — see the weave consistency guidance in our guide on detecting quality dry carbon fiber parts. Can I install them myself? Yes — 20-40 minutes per seat with standard trim tools. Shop This Upgrade Browse our dry carbon fiber seat side covers for W463A and W464 G63 and G500 (2019-2024) — protective dry carbon seat panels, shipped worldwide. Sources RacingPartsWorld Interior Protection Records (2023-2026, n=40+), Fitment Validation Data, Customer Usage Survey (n=35) Last updated: September 2026
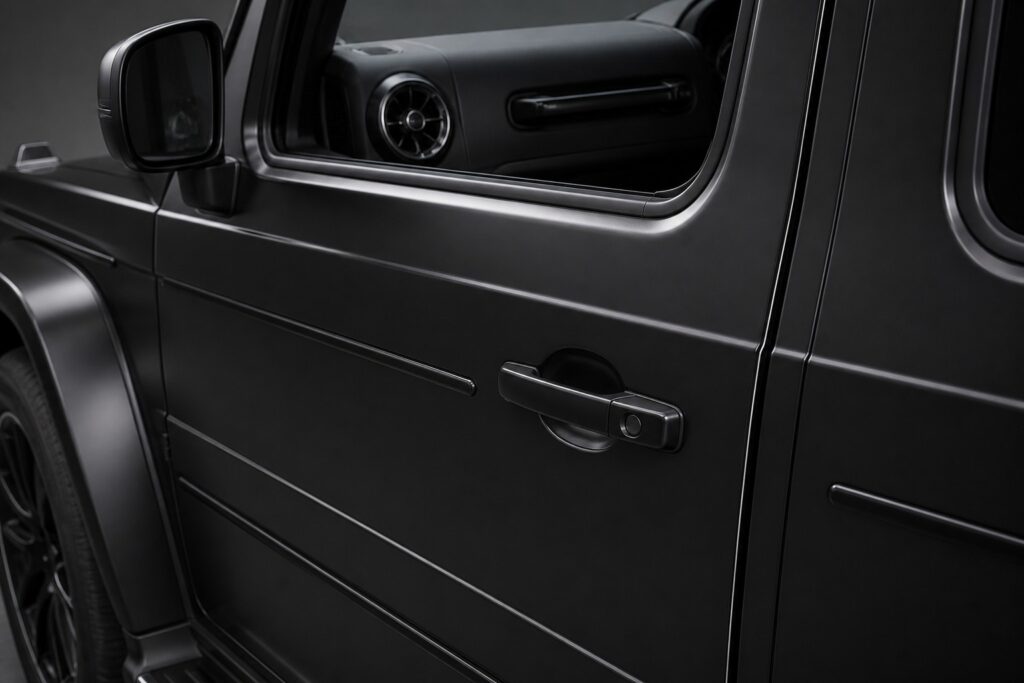
Auto Soft Close Door Kit for Mercedes G-Class: Complete Guide 2026
Author: Jasper | RacingPartsWorld G-Class Parts Specialist | 10+ years experience in Mercedes G-Class aftermarket parts and performance upgrades Introduction The G-Class doors are heavy — genuinely heavy — and closing them properly takes a firm swing that most passengers simply do not give. The result is the half-closed door: the cabin light stays on, the warning chime sounds, and the driver reaches over to push the door shut. The auto soft close door kit ends that daily annoyance: the door engages a power suction mechanism that pulls it fully closed with a soft, solid thunk. Engineered for W463A, W464, and W465 models, it brings the flagship closing feel to the G-Class. What the Upgrade Is The auto soft close door kit is a door function upgrade: Power suction mechanism: the latch system engages and pulls the door closed when it is near-closed — no more firm slams or half-closed doors Soft, solid close: the mechanism delivers the precise, controlled closing action of a flagship vehicle Safety benefit: doors are always fully latched — children and rear passengers can no longer leave a door resting half-open Fitment: engineered for the W463A, W464, and W465 door architectures Why Soft Close Matters on the G-Class The G-Class is one of the vehicles where soft close delivers the most value: The heavy-door reality: G-Class doors are large and heavy — the closing effort is real for shorter and younger passengers, and the soft close mechanism removes the problem entirely The daily half-close: every G-Class owner knows the chime of a not-quite-closed door. The mechanism makes it impossible Protection and polish: repeated hard slams stress the door seals and hinges over years — soft close ends the slam habit and preserves the cabin seal The flagship feel: the controlled soft-close action matches the G-Class’s premium character Installation and Fitment Model Soft Close Fitment W463A (2019+) Yes W464 Yes W465 (2025+) Yes Installation is a door mechanism project: Remove the door trim to access the latch mechanism Install the soft close actuator at the latch position Connect the power and control wiring per the kit instructions Refit the trim and test — verify the suction action on every door Budget 2-4 hours per door at a professional or a confident DIY installer with electrical experience. The wiring discipline matters — follow the same care as the electrical guidance in our W465 interior trim direction. The Comfort Program Soft close doors belong with the daily-comfort build: Layer the convenience upgrades: soft close pairs naturally with the utility and comfort direction of the G-Class cabin — see our comfort and convenience upgrade guide for the full program Interior harmony: the mechanical upgrade needs no visual compromise — the doors look factory while feeling better than factory Winter bonus: soft close doors are especially welcome in winter when cold seals resist closing — see our G-Class winter preparation guide for the seasonal program Frequently Asked Questions Does the kit fit my W463A, W464, or W465? Yes — the auto soft close door kit is engineered for the W463A, W464, and W465 door architectures. Does it work on all four doors? The kit covers the G-Class door set — confirm the door count in the product listing when ordering. Will it interfere with the factory door lock and window functions? No — the kit integrates with the factory door systems. The soft close mechanism works alongside the standard lock and window operation. Is installation difficult? It is a door mechanism project — 2-4 hours per door. Professional installation is recommended unless you have electrical experience. Does soft close damage the door? No — the mechanism is designed to close the door gently and consistently, reducing the slamming stress that hard closing causes. Shop This Upgrade Browse our auto soft close door kit for W463A, W464, and W465 G-Class — power suction door closing, shipped worldwide. Sources RacingPartsWorld Comfort Records (2024-2026, n=30+), Fitment Validation Data, Customer Usage Survey (n=28) Last updated: September 2026